Setting up Windows 10 for Terraform IaC

Ensuring your Windows 10 device is configured correctly to work with Azure Devops & Terraform for IaC is very important. I've created a guide on how to do this correctly which should ease your transition to IaC if you're used to web-based or PowerShell based deployments.
I'm assuming here that you have Devops setup and ready to go, if you don't - just head over to http://dev.azure.com and signup for a free trial.
Installing Core Apps
The following core apps required for IaC using Devops & Terraform need to be installed - are all free too!
Visual Studio Code
The IDE we'll be using, has everything you need to start deveoping - https://code.visualstudio.com/Download
GIT for Windows
GIT is a version-control system for tracking changes in code during IaC development. Although it is desgined for multiple programmers to make and track changes to code, working with it in your test environment will ease transition to correct working practices in your future production environment - https://git-scm.com/downloads
Node.js
Node.js is a Javascript runtime that's required to use Terraform in the Azure Cloud Shell in VS Code - https://nodejs.org/en/download
Configuring VS Code
VS Code is a bit of a monster and can be used for lots of different types of development so we need to install some extensions to make it work how we want it to for Terraform / Azure IaC.
Open VS Code, then click view > extensions, on the following icon to open the extensions panel.

Extensions to install
We need to install the following extensions for Terraform / IaC with Azure
HashiCorp Terraform
The based Terraform extension which adds syntax highlighting and other editing features
Azure Terraform
The Azure Terraform extension provides terraform command support, resource graph visualization and CloudShell integration inside VSCode.
GitLens
The core GIT extension which gives you visibility of the DevOps repo and see code authoring changes.
Azure Resource Manager (ARM) Tools
Provides ARM Language support for VS Code.
Close and re-open VS Code
It's really important at this point to initialise the extensions correctly by closing and re-opening VS Code. Once you do this - you'll see in the bottom right the extensions will be started & updated where necessary.
Configuring the Extensions
Now we've installed the required extensions, we need to ensure they're configured correctly. We need to clone the DevOps GIT repo, and setup a few global variables to enable change control. We then need to connect VS Code to your Azure subscription.
Configure GIT with your details
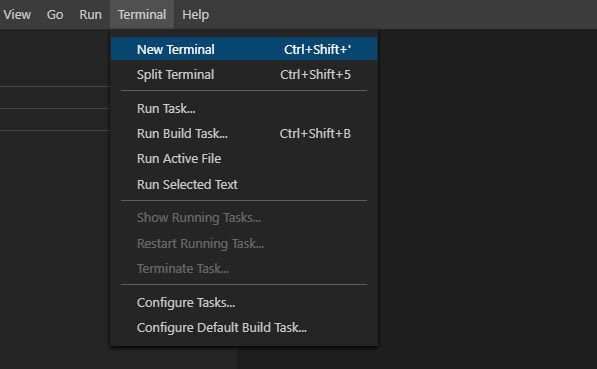
When you're inside VS Code, click on terminal in the menu and select 'New Terminal'
Type the following to set your display name & e-mail address
git config --global user.email "This email address is being protected from spambots. You need JavaScript enabled to view it."
git config --global user.name "Firstname Lastname"
Connect your local GIT to the Devops repo
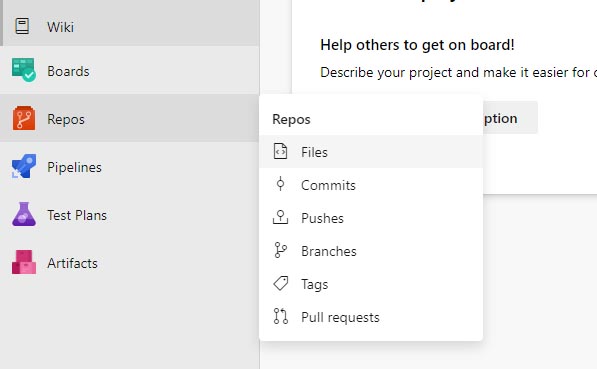
Navigate to https://dev.azure.com and click on your Devops project, then click on Repos > files.
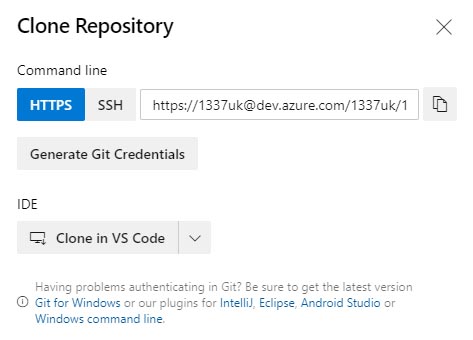
Click 'clone' in the top right, then when the popup appears, select 'Clone in VS Code'. If you get prompted for URL permissions, in both the browser and in VS Code, click allow.
The focus will switch back to VS Code and a 'choose folder' window will open. It's important here not to choose a folder inside your OneDrive or any other storage that may have a sync agent attached. We're setting up a local copy of the cloud repository and we need to ensure that GIT and VS Code handles all the code changes.
Git will start to clone the repository - depending on how you have SSO setup, you might be prompted to authenticate again to Azure.
Sign-in to Azure
Now we've cloned the repo, we need to signin to Azure to enable the cloud shell..
Press F1, then type 'Azure Signin', then click on the 'Azure: Sign in' command. You will be taken to your Azure login (or not if you have SSO enabled) and you will see your account name at the bottom of VS Code.
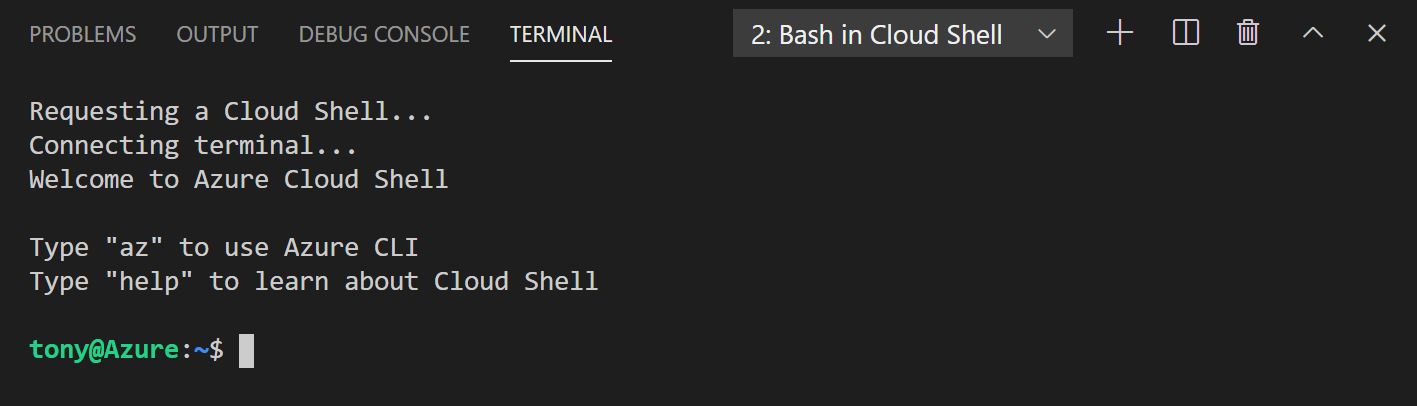
That's pretty much it - you can now test opening a cloud shell by pressing F1, then entering 'Azure: Open Bash in Cloud Shell' - you should see the following as the shell is connected;
And that's it - you now have your Windows 10 machine setup and ready to start Terraforming your Azure Infrastructure!