Azure Devops Terraform Secure VM domain join
Well, my SEO plugin kept warning me that the title of this article was too long - so I made it shorter but the below is exactly what this article describes how to do;
Creating an Azure Keyvault in Terraform, and using secrets from the vault to automatically domain-join terraform created virtual machines.
Rolls off the tongue hey - anyway the main steps are below;
1. Create a Key Vault in Azure
2. Manually populate the vault with a secret 'domain admin' password which is used to automatically join VMs to the domain and a local account password that's used to provision the VM
3. Provision a VM using terraform
4. Enable the DomJoin VM extension and configure this to join the domain.
As with all the other articles, this assumes you have an Active Directory domain already configured, and the Azure Virtual Network setup with the right DNS servers and also your DevOps configured to use terraform (there are a few guides on this, I'll create my own in the upcoming weeks though).
If you're not sure whether you have this setup ready to go - manually create a VM and join it to the domain as a test. If this works - you can follow this article. If it fails, fix the manual join first then come back to this article.
There are three pieces of information before we start that we need to add to the terraform configuration;
1. The Azure AD Tenant ID
2. A group of users we'll give access to create permissions in the Key Vault
3. Your pipeline managed identity GUID
Collecting the information
The Azure AD Tenant ID
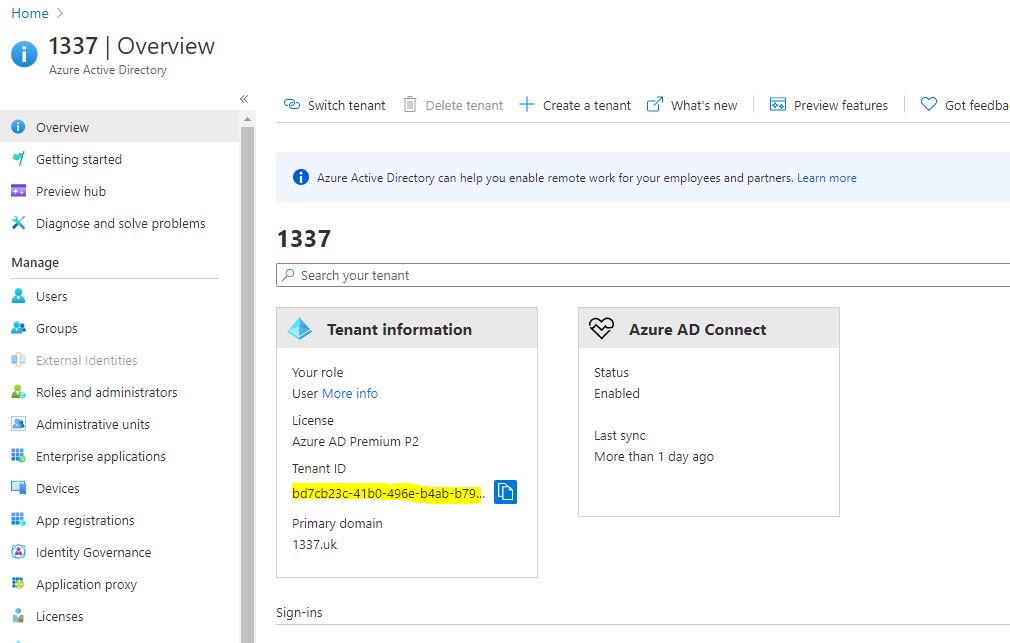
Navigate to portal.azure.com and click Azure Active Directory
Click the copy button that's next to the Azure Active Directory GUID and stick it in a notepad.
A group of admin users
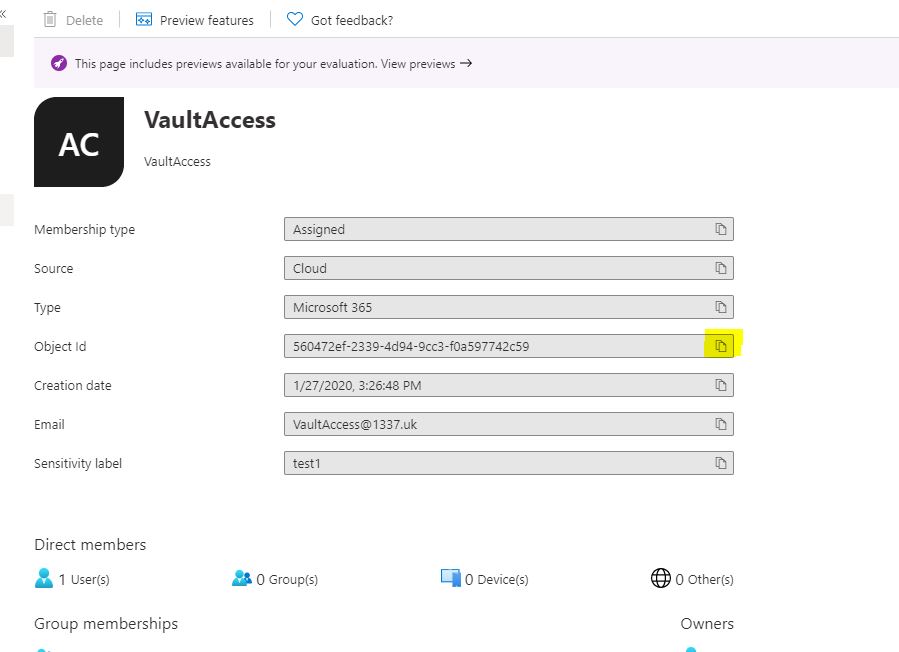
While you're still in Azure AD - click groups and either create a group, or select an existing group and copy the GUID of this group to notepad too.
Azure Pipeline Managed Identity
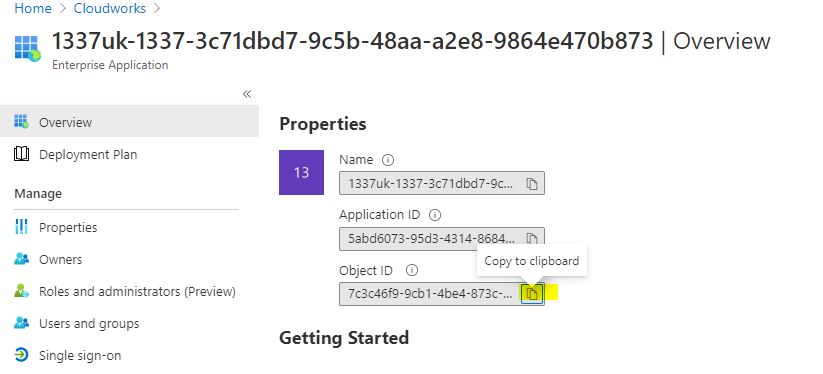
To get this GUID, you'll need to navigate to your enterprise application that you created when your pipeline was provisioned. It generally follows the format;
<Devops Organisation>-<Devops Project>-<guid>
You can usually just search Azure Active Directory for your DevOps project name, and you'll see your enterprise app there.
Copy this GUID and stick it in Notepad.
Create the base Terraform Configuration
If you already have your pipeline configured, you won't need to do this - but here are the default configuration items, these contain;
- The AzureRM backend config
- A resource group for the resources
- An Azure Virtual Network for the resources (you may not need this)
- An Azure Subnet for the resources (you may not need this)
- A location variable we'll use for all elements
- The Azure AD tenant ID (taken from the previous step)
- A vault access group we'll use to give us permissions to create and view secrets (taken from the previous step)
- Two vault secret variable references, one for the domain admin and one for the local admin
Create the baseline-config.tf and save the following contents;
#Configure the Azure Backend Config
terraform {
required_version = ">=0.12"
backend "azurerm" {}
}

provider "azurerm" {
    environment = "public"
    features {}
}

resource"azurerm_resource_group" "rg-1337" {
    name     = "rg-1337-01"
    location = var.location
}

# Create a virtual network and add custom DNS servers (pointing at my Domain Controller)
resource "azurerm_virtual_network" "VMnetwork" {
    name                = "VMnetwork"
    address_space       = ["10.0.0.0/16"]
    location            = var.location
    dns_servers         = ["10.0.2.4"]
    resource_group_name = azurerm_resource_group.rg-1337.name
}
resource "azurerm_subnet" "VMsubnet" {
    name                 = "VMSubnet"
    resource_group_name  = azurerm_resource_group.rg-1337.name
    virtual_network_name = azurerm_virtual_network.VMnetwork.name
    address_prefixes     = ["10.0.2.0/24"]
}

#Create the location variable
variable "location" {
 type = string
 description = "The location in which to create the Azure Resources"
 default = "uk south"
 }

# Create the variable for the Azure AD Tenant - Copied from the previous step
variable "tenantID" {
 type = string
 description = "The Azure AD tenant ID which you're going to use for the Vault Access Policies"
 default = "abcde123-abce-1234-abcd-abcde123456"
 }

#Create the reference to the Group we'll use to assign permissions to the KeyVault - Copied from the previous step
 variable "vaultAccessGroup" {
 type = string
 description = "The objectID of the group which you wish to assign access to the vaults' secrets"
 default = "abcde1234-1234-abcd-1234-abcdef12345"
 }

#Create the Domain Admin Account secret - this doesn't exist yet, we'll create them in a second
data "azurerm_key_vault_secret" "Azure-SA" {
name = "Azure-DA"
key_vault_id = azurerm_key_vault.kv-shared-001.id
}
#Create the Local Admin Service Account secret - this doesn't exist yet either, don't worry..
data "azurerm_key_vault_secret" "Azure-LA" {
name = "Azure-LA"
key_vault_id = azurerm_key_vault.kv-shared-001.id
}
Create a Keyvault in Azure
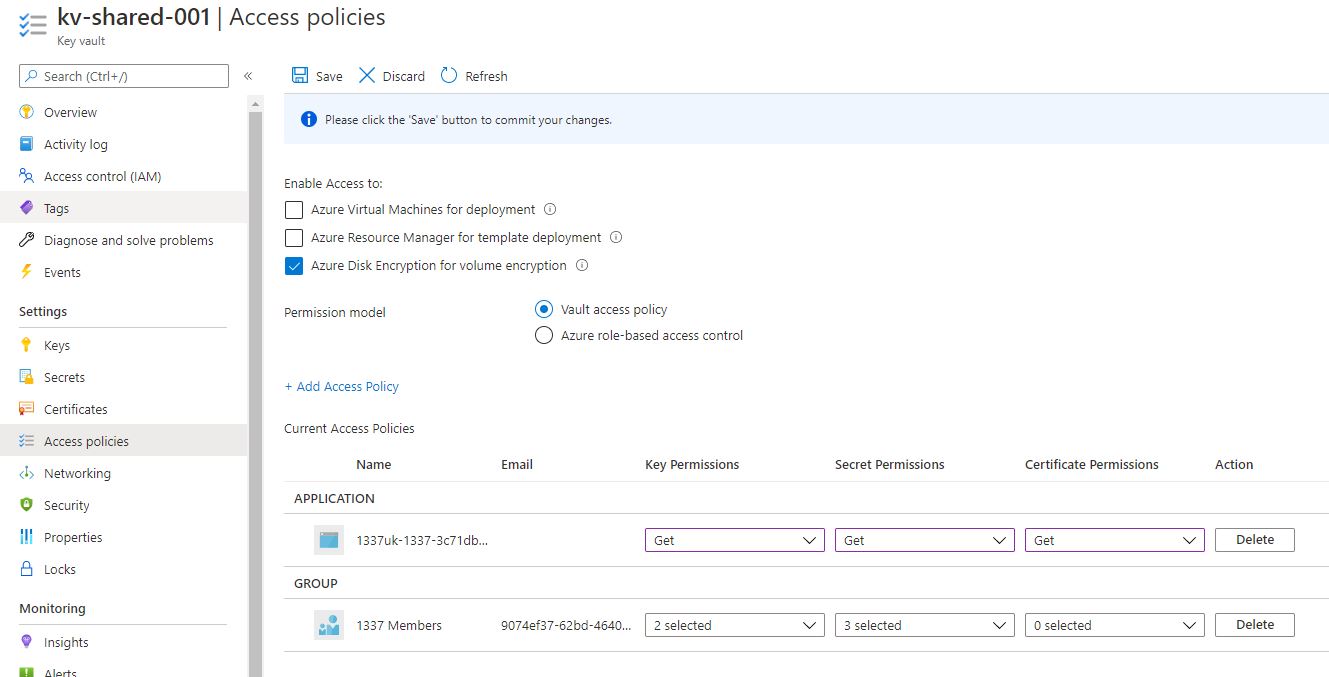
Pretty standard Key Vault here, with a couple of access policies - one for us to view and add secrets, and the other for the Terraform pipeline managed identity to retrieve and use inside Terraform.
#Create the Keyvault
resource "azurerm_key_vault" "kv-shared-001" {
  name = "kv-shared-001"
  location = var.location
  resource_group_name = azurerm_resource_group.rg-1337.name
  enabled_for_disk_encryption = true
  tenant_id = var.tenantID
  soft_delete_retention_days = 7
  purge_protection_enabled = false
  sku_name = "standard"

#Create the access policiy for the Group of users (basically us)
access_policy {
    tenant_id = var.tenantID
    object_id = var.vaultAccessGroup

    key_permissions = [
      "get","create",
    ]
    secret_permissions = [
      "get","list","set",
    ]
    storage_permissions = [
      "get",
    ]
  }

#Create the access policy for the terraform managed identity
access_policy {
    tenant_id = var.tenantID
    object_id = "7c3c46f9-9cb1-4be4-873c-40a1a1a51918"

    key_permissions = [
      "get",
    ]
    secret_permissions = [
      "get",
    ]
    storage_permissions = [
      "get",
    ]
  }

#Enable remote access to the vault
  network_acls {
    default_action = "Allow"
    bypass = "AzureServices"
  }
}
We need to commit this code and run this pipeline now so we create the Key Vault which we need to populate with those two admin passwords;
Save your changes, commit them and push to the repo and wait for the Key Vault to be created;
2021-02-18T12:08:35.3379250Z azurerm_key_vault.kv-shared-001: Creating...
2021-02-18T12:08:45.3507707Z azurerm_key_vault.kv-shared-001: Still creating... [10s elapsed]
2021-02-18T12:08:55.3393897Z azurerm_key_vault.kv-shared-001: Still creating... [20s elapsed]
2021-02-18T12:09:05.3816005Z azurerm_key_vault.kv-shared-001: Still creating... [30s elapsed]
2021-02-18T12:09:15.3409726Z azurerm_key_vault.kv-shared-001: Still creating... [40s elapsed]
2021-02-18T12:09:25.3430942Z azurerm_key_vault.kv-shared-001: Still creating... [50s elapsed]
2021-02-18T12:09:35.3417344Z azurerm_key_vault.kv-shared-001: Still creating... [1m0s elapsed]
2021-02-18T12:09:45.3434460Z azurerm_key_vault.kv-shared-001: Still creating... [1m10s elapsed]
2021-02-18T12:09:55.3452030Z azurerm_key_vault.kv-shared-001: Still creating... [1m20s elapsed]
2021-02-18T12:10:05.3461827Z azurerm_key_vault.kv-shared-001: Still creating... [1m30s elapsed]
2021-02-18T12:10:15.3493657Z azurerm_key_vault.kv-shared-001: Still creating... [1m40s elapsed]
2021-02-18T12:10:25.3484896Z azurerm_key_vault.kv-shared-001: Still creating... [1m50s elapsed]
2021-02-18T12:10:35.3488549Z azurerm_key_vault.kv-shared-001: Still creating... [2m0s elapsed]
2021-02-18T12:10:39.1517632Z azurerm_key_vault.kv-shared-001: Creation complete after 2m4s [id=/subscriptions/3c71dbd7-9c5b-48aa-a2e8-9864e470b873/resourceGroups/rg-dc-tfgmhub-01/providers/Microsoft.KeyVault/vaults/kv-shared-001]
The Azure Key Vault should be create with the right permissions
Add User Accounts
We need to manually populate the Key Vault with secrets that we'll use for a local admin password, and also a domain admin password that's been configured in your domain. For this example, I've used Azure-LA for the local admin password, and Azure-DA for the domain admin password (make sure you create a domain admin with the same credentials in your Active Directory Domain. Create these secrets as below;

Create the Virtual Machines
We're keeping these VMs pretty simple - no network security group rules and no public IP. If you need them, you can add them but we don't need them for this example. There are a few important items of note;
OuPath Element
- You can't use the standard 'computers' container, create or select a different OU
- Make sure you use the correct distinguished name in the OUpath element, if you're unsure -
- Open up AD users and computers
- Enable advanced features
- Right click on the OU, and select properties
- Click Attribute Editor
- Scroll down to distinguishedName and copy the value
Enter the correct domain details
It's important to change the code below to the correct domain details - here, the domain is called 1337.uk and the netbios name is 1337uk. Change these to match your domains.
settings = <<SETTINGS
{
"Name": "1337.uk", ---- your AD Domain name
"OUPath": "OU=Servers,DC=1337,DC=uk", --- Your OU path
"User": "1337uk\\Azure-DA", --- Your netbios name \\ Your Domain Admin username
"Restart": "true",
"Options": "3"
}
#Create a Network Security Grup
resource "azurerm_network_security_group" "VMnsg" {
    name                = "VMNetworkSecurityGroup"
    location            = var.location
    resource_group_name = azurerm_resource_group.rg-1337.name
}

#Create the VM's Network Interface
resource "azurerm_network_interface" "VMnic" {
    name                        = "VMNIC"
    location                    = var.location
    resource_group_name         = azurerm_resource_group.rg-1337.name

    ip_configuration {
        name                          = "VMNicConfiguration"
        subnet_id                     = azurerm_subnet.VMsubnet.id
        private_ip_address_allocation = "Dynamic"
    }
}

# Connect the security group to the network interface
resource "azurerm_network_interface_security_group_association" "VMNicNsg" {
    network_interface_id      = azurerm_network_interface.VMnic.id
    network_security_group_id = azurerm_network_security_group.VMnsg.id
}

resource "azurerm_windows_virtual_machine" "vm" {
  name                = "vm"
  resource_group_name = azurerm_resource_group.rg-1337.name
  location            = var.location
  size                = "Standard_B2s"
  admin_username      = "Azure-LA"
  admin_password= "data.azurerm_key_vault_secret.Azure-LA.value"
  network_interface_ids = [
    azurerm_network_interface.VMnic.id,
  ]

  os_disk {
    caching              = "ReadWrite"
    storage_account_type = "Standard_LRS"
  }

  source_image_reference {
    publisher = "MicrosoftWindowsServer"
    offer     = "WindowsServer"
    sku       = "2016-Datacenter"
    version   = "latest"
  }
}

resource "azurerm_virtual_machine_extension" "domjoin" {
name = "domjoin"
virtual_machine_id = azurerm_windows_virtual_machine.vm.id
publisher = "Microsoft.Compute"
type = "JsonADDomainExtension"
type_handler_version = "1.3"
settings = <<SETTINGS
{
"Name": "1337.uk",
"OUPath": "OU=Servers,DC=1337,DC=uk",
"User": "1337uk\\Azure-DA",
"Restart": "true",
"Options": "3"
}
SETTINGS
protected_settings = <<PROTECTED_SETTINGS
{
"Password": "${data.azurerm_key_vault_secret.Azure-DA.value}"
}
PROTECTED_SETTINGS
}
Run this terraform and wait for the VM to be created.
You'll observe the following in the terraform logs;
1. The Virtual Machine will be created;
azurerm_windows_virtual_machine.vm: Creating...
azurerm_windows_virtual_machine.vm: Still creating... [10s elapsed]
azurerm_windows_virtual_machine.vm: Still creating... [20s elapsed]
azurerm_windows_virtual_machine.vm: Still creating... [30s elapsed]
azurerm_windows_virtual_machine.vm: Still creating... [40s elapsed]
azurerm_windows_virtual_machine.vm: Still creating... [50s elapsed]
azurerm_windows_virtual_machine.vm: Still creating... [1m0s elapsed]
azurerm_windows_virtual_machine.vm: Still creating... [1m10s elapsed]
azurerm_windows_virtual_machine.vm: Still creating... [1m20s elapsed]
azurerm_windows_virtual_machine.vm: Still creating... [1m30s elapsed]
azurerm_windows_virtual_machine.vm: Still creating... [1m40s elapsed]
azurerm_windows_virtual_machine.vm: Still creating... [1m50s elapsed]
azurerm_windows_virtual_machine.vm: Still creating... [2m0s elapsed]
azurerm_windows_virtual_machine.vm: Creation complete after 2m2s [id=/subscriptions/3c71dbd7-9c5b-48aa-a2e8-9864e470b873/resourceGroups/rg-1337/providers/Microsoft.Compute/virtualMachines/vm]
2. The domjoin extension will run;
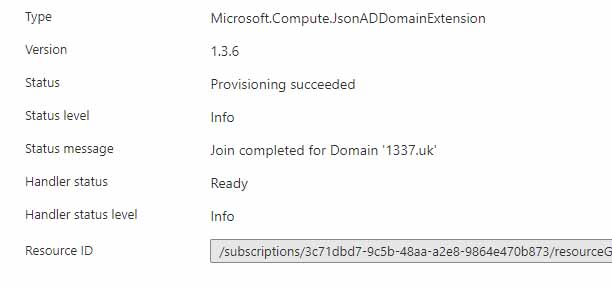
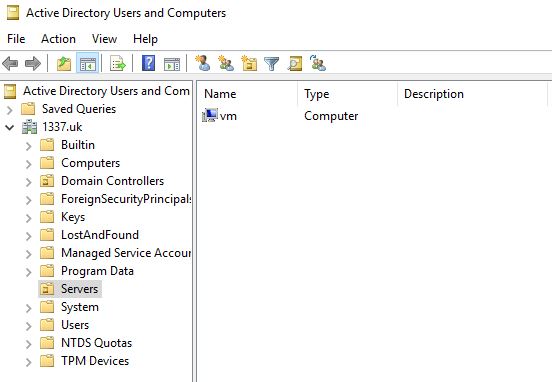
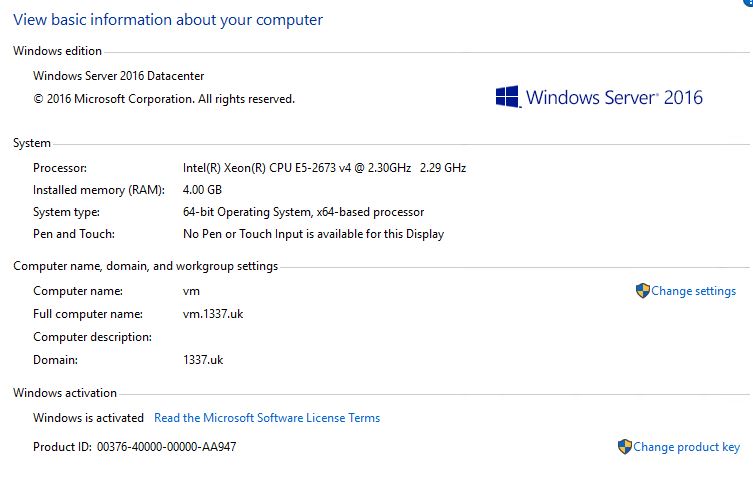
And the newly provisioned VM is now on the domain..
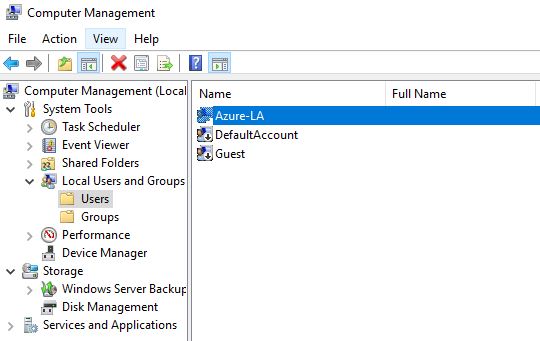
And has the local admin password specified in the vault.
Happy to hear any comments, or help anyone that's struggling with this process or anything similar! :)
at your event, give a workshop or
write an article? This email address is being protected from spambots. You need JavaScript enabled to view it. ✌️
